3 Design A Simple ISA Simulator
3.1 What is ISA Simulator (ISS)?
When discussing RISC-V and its instructions, people often imagine a physical processor circuit capable of executing them. However, building an actual digital processor is usually a time-consuming task. To prototype ideas more quickly, we can instead build a simulator which is implemented in general purpose programming languages like C/C++.
Designing real hardware like a CPU typically requires Hardware Description Languages (HDLs), such as Verilog or SystemVerilog, which are relatively low-level and detail-oriented. In contrast, a simulator can be developed using general-purpose programming languages like C, C++, or Python. Simulators also abstract away many low-level concerns such as timing information and register-level transactions, allowing us to save a significant amount of development time.
In this lab, our goal is to build a simulator that mimics the behavior of a RISC-V machine. Such a tool is commonly referred to as an Instruction Set Architecture (ISA) Simulator, or ISS for short. The role of the ISS is straightforward: it recognizes RISC-V instructions and executes them accordingly.
3.2 Overall Architecture of Example ISS
The overall execution flow of an ISS can be abstracted into three main steps: Fetch, Decode, and Execute.
- In the fetch stage, the ISS reads memory (either ROM or RAM) to retrieve the next instruction.
- The fetched instruction is then processed in the decode stage, which produces an
inst_enum_tindicating the type of instruction. - Finally, both the
inst_fields_t(instruction fields) andinst_enum_tare passed to the execution stage, where the instruction is carried out.
A keypoint to note is that updates to the architectural state occur only during the execution stage. Neither the fetch stage nor the decode stage modifies the architectural state.
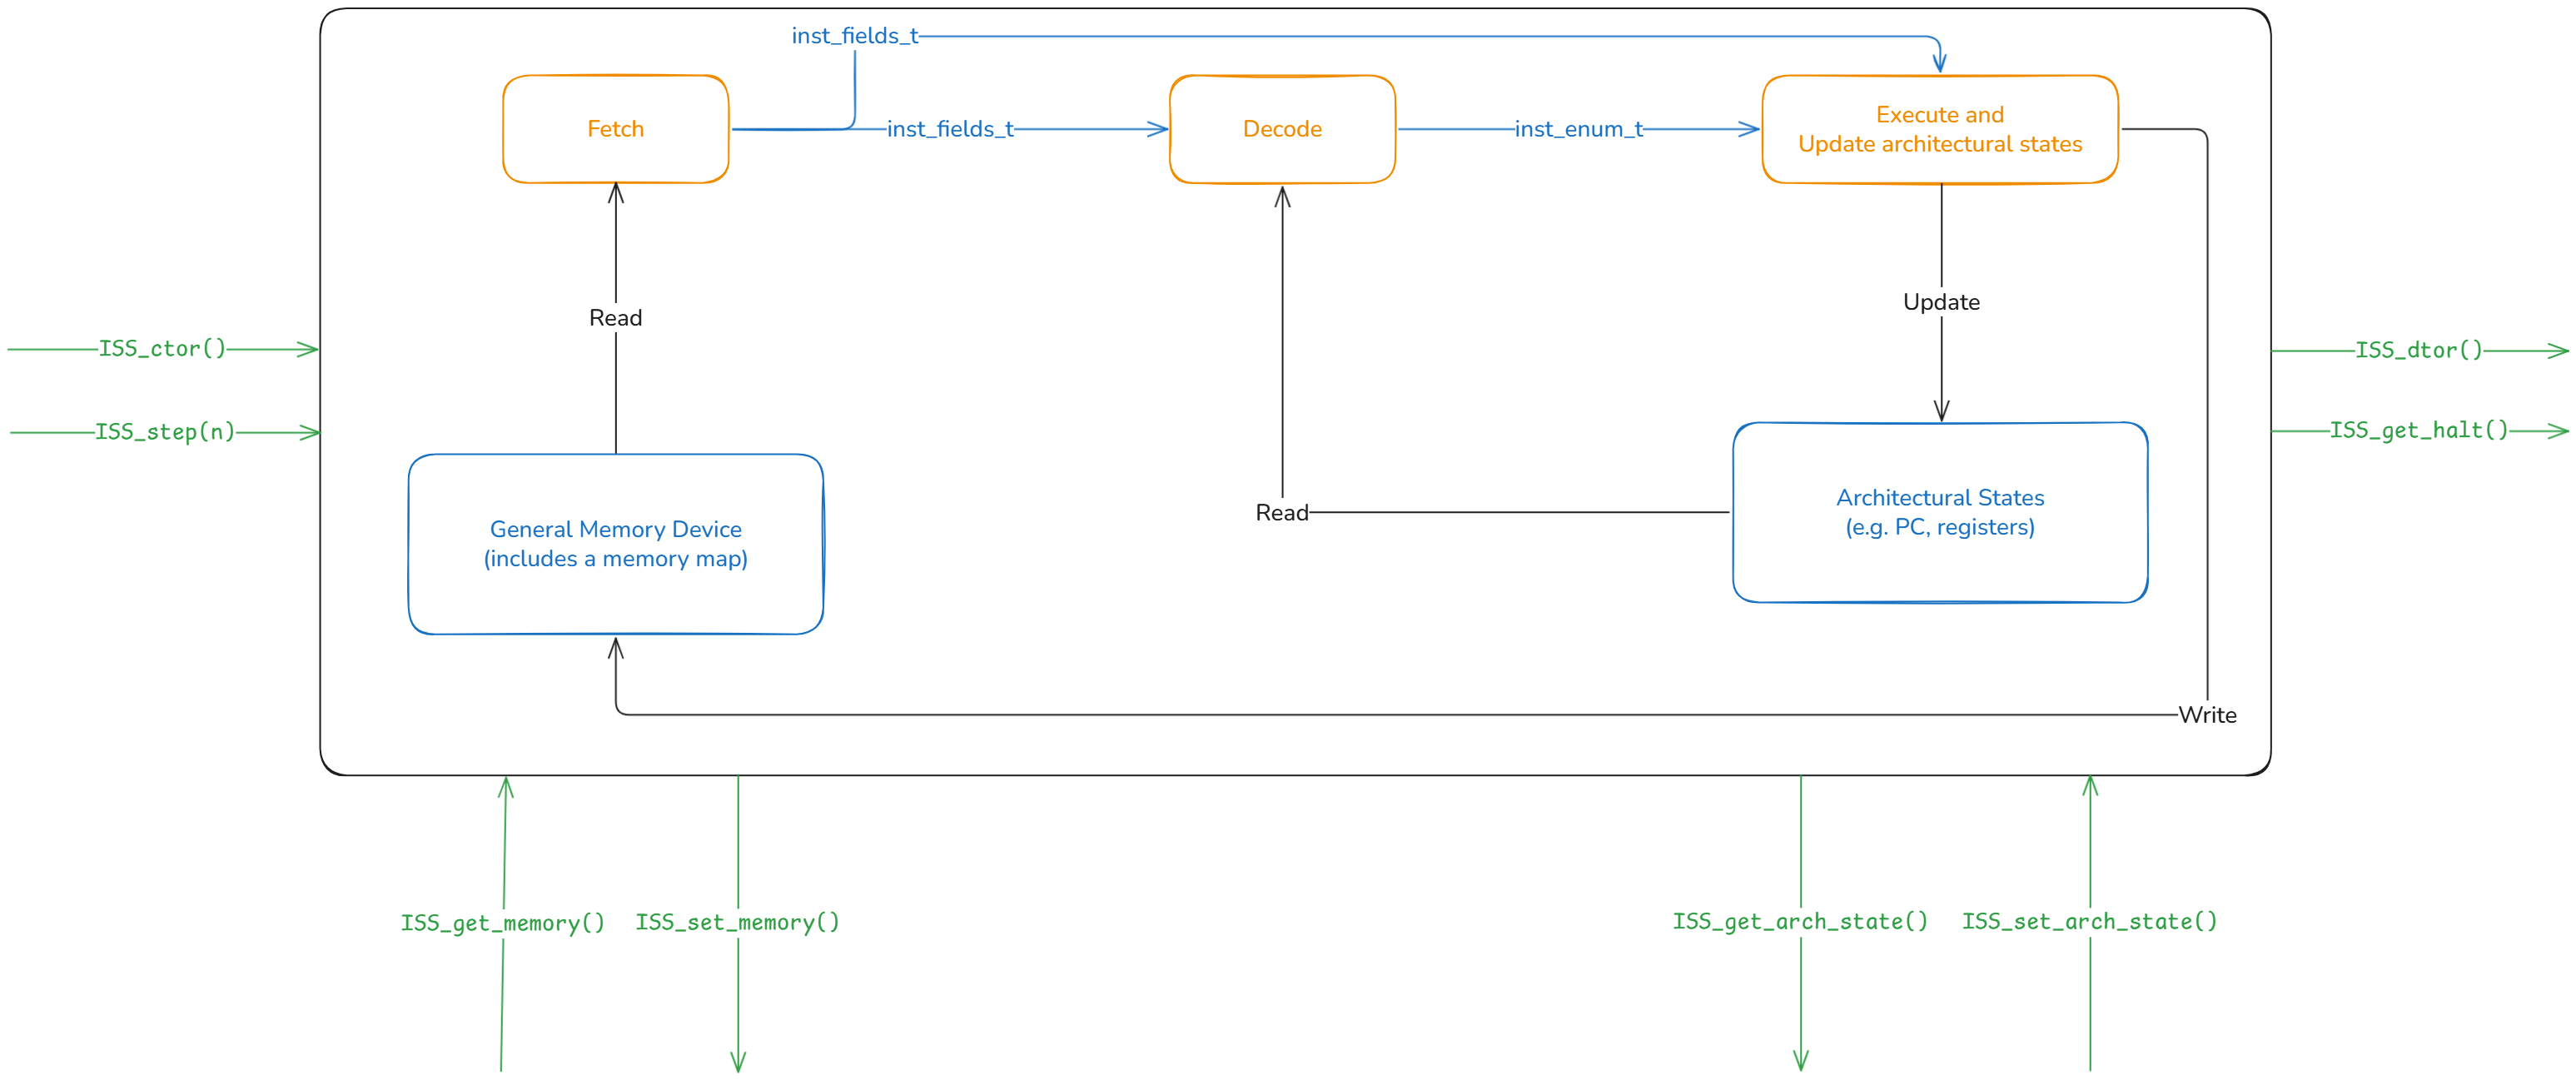
In addition to the ISS itself, we also provide eight public APIs. These APIs make the ISS easier to test and integrate. More importantly, they are essential for reference-model-based verification, as described in Chapter 9.
3.3 Detailed Architecture of Example ISS
3.3.1 Defining Architectural States
For an ISA simulator, the most important task is to parse the input RISC-V instruction and then execute it. Here, execution specifically refers to the ability to modify the architectural state.
In the RISC-V ISA — particularly in the RV32I subset that we aim to implement—the architectural state mainly consists of two components:
- Program Counter (PC)
- General Purpose Registers (GPRs)
arch.h
In our implementation, we define a user-defined type called arch_state_t, which is composed of PC and GPRs. As for the main memory, we classify it into the generic memory map devices, and this is the reason why the main memory is not included into the arch_state_t.
3.3.2 Some Pre-Defined Information
To develop the ISS more effectively, we define several custom data types (i.e., user-defined data structures) that make the code cleaner, more elegant, and easier to read.
Firstly, we define inst_fields_t by using union in C language to make the decoding of instruction more convenient.
inst.h
/* define 6 (4 base + 2 extended) types of formats of instructions in RV64I */
typedef union {
    struct {
        uint32_t opcode : 7;
        uint32_t rd : 5;
        uint32_t func3 : 3;
        uint32_t rs1 : 5;
        uint32_t rs2 : 5;
        uint32_t func7 : 7;
    } R_TYPE;
    struct {
        uint32_t opcode : 7;
        uint32_t rd : 5;
        uint32_t func3 : 3;
        uint32_t rs1 : 5;
        int32_t imm_11_0 : 12;
    } I_TYPE;
    struct {
        uint32_t opcode : 7;
        uint32_t imm_4_0 : 5;
        uint32_t func3 : 3;
        uint32_t rs1 : 5;
        uint32_t rs2 : 5;
        int32_t imm_11_5 : 7;
    } S_TYPE;
    struct {
        uint32_t opcode : 7;
        uint32_t rd : 5;
        int32_t imm_31_12 : 20;
    } U_TYPE;
    struct {
        uint32_t opcode : 7;
        uint32_t imm_11 : 1;
        uint32_t imm_4_1 : 4;
        uint32_t func3 : 3;
        uint32_t rs1 : 5;
        uint32_t rs2 : 5;
        uint32_t imm_10_5 : 6;
        int32_t imm_12 : 1; // highest imm
    } B_TYPE;
    struct {
        uint32_t opcode : 7;
        uint32_t rd : 5;
        uint32_t imm_19_12 : 8;
        uint32_t imm_11 : 1;
        uint32_t imm_10_1 : 10;
        int32_t imm_20 : 1; // highest imm
    } J_TYPE;
    uint32_t raw;
} inst_fields_t;
For example, there is a add, x1, x2, x3 instruction, and we already know that it is R-Type format instruction. We can decode the ADD instruction as following:
// set the inst to be `add x1, x2, x3`
inst_fields_t inst = {};
inst.raw = 0x003180b3;

// if we want to get opcode, func3, func7, rs1, rs2 and rd
unsigned opcode = inst.R_TYPE.opcode;
unsigned func3 = inst.R_TYPE.func3;
unsigned func7 = inst.R_TYPE.func7;
unsigned rs1_index = inst.R_TYPE.rs1;
unsigned rs2_index = inst.R_TYPE.rs2;
unsigned rsd_index = inst.R_TYPE.rd;
Secondly, we define inst_enum_t by using enum in C language to enumerate all the instructions we must implement in this lab.
inst.h
/*
 * Enumerate 37 instructions in total
 * It should be generated in ISS_decode() stage
 */
typedef enum {
    // OP
    inst_add,
    inst_sub,
    inst_sll,
    inst_slt,
    inst_sltu,
    inst_xor,
    inst_srl,
    inst_sra,
    inst_or,
    inst_and,
    // OP-IMM
    inst_addi,
    inst_slti,
    inst_sltiu,
    inst_xori,
    inst_ori,
    inst_andi,
    inst_slli,
    inst_srli,
    inst_srai,
    // LOAD
    isnt_lb,
    inst_lh,
    inst_lw,
    inst_lbu,
    inst_lhu,
    // STORE
    inst_sb,
    inst_sh,
    inst_sw,
    // BRANCH
    inst_beq,
    inst_bne,
    inst_blt,
    inst_bge,
    inst_bltu,
    inst_bgeu,
    // JAL
    inst_jal,
    // JALR
    inst_jalr,
    // AUIPC
    inst_auipc,
    // LUI
    inst_lui,
} inst_enum_t;
With inst_fields_t, the way to decode a instruction becomes easier, which will be introduced in Section 3.3.3.2 in more detail. Furthermore, inst_enum_t also helps us to implement the logic about execution stage in a more elegant way. For example, one might implement the execution stage in a large switch-case statement in C language with the presence of inst_enum_t. Examples about how to implement execution logic will be introduced in Section 3.3.3.3 as well.
3.3.3 Break Down the ISS Implementation from A Top-Down Approach
In order to better understand the structure of the ISS TA provides, we are going to examine codes of the ISS in a top-down approach.
We must realize the definition of structure ISS and Core before we start to break down the execution loop of the ISS.
struct iss {
    // core part (RISC-V processor)
    Core core;

    // MMIO devices
    ROM rom_mmio;
    MainMem main_mem_mmio;
    TextBuffer text_buffer_mmio;
    Halt halt_mmio;
};

typedef struct {
    Tick super; // inherit from parent class

    // internal states of core (includes memory map object)
    arch_state_t arch_state; // RISC-V architectural states
    reg_t new_pc;            // helper data member for next-pc calculation
    MemoryMap mem_map;       // memory map which contains all MMIO devices (with
                             // LOAD/STORE capability)
} Core;
As you can see, firstly, there are five components inside the struct iss:
CoreROMMainMemTextBufferHalt
The struct Core is the main component we mainly care about in Lab 1 because most of the functionalities about RISC-V are all inside Core. ROM and MainMem are children classes of AbstractMem which will be introduced later. TextBuffer is children of both AbstractMem and Tick, and we will also introduce Tick in the next section. Lastly, the struct Halt is children class of AbstractMem, and the struct is simply a kind of flag to indicate whether to stop the simulation.
Next, let’s look inside the struct Core. Inside Core, there are four components, and they have different responsibilities.
Tick superarch_state_t arch_statereg_t new_pcMemoryMap mem_map
The reason why we define Tick super inside Core is that we want to mimic the inheritance in OOP design paradigm in the ISS. In other words, we want Core to inherit from its parent class Tick. Inheriting from Tick, we can manipulate the struct Core like a clock-trigger component, which gives us more fine-grained control over the simulator.
Except for super in the Core, there are arch_state and new_pc as well. The arch_state contains two major components: 32 general purpose registers (GPRs) and the current Program Counter (PC), while the new_pc is a helper data which will be used in the function Core_update_pc().
After knowing the structures about ISS and Core, We can now try to break down the overall execution loop of the ISS.
void ISS_step(ISS *self, unsigned long n_step) {
    for (unsigned i = 0; i < n_step; i++) {
        // check halt flag
        if (unlikely(self->halt_mmio.halt_flag == true)) {
            return;
        }
        // tick all tickable devices (includes core itself)
        Tick_tick(&self->core.super);
        Tick_tick(&self->text_buffer_mmio.tick_super);
    }
}
The ISS check the halt flag at the first to determine whether to stop the current step execution. If the halt flag is false, the ISS will then try to tick one of its data member called core and text_buffer_mmio. Let’s examine the implementation of tick function for core:
As you can see, it contains three main steps for a step of ISS execution: Core_fetch(), Core_decode() and Core_execute(). After these three steps are completed, the ISS will update the current PC to the new PC value via Core_update_pc().
As for container_of() macro, you can refer to Section B.4.
Fetch
static inst_fields_t Core_fetch(Core *self) {
    // fetch instruction according to self->arch_state.current_pc
    byte_t inst_in_bytes[4] = {};
    MemoryMap_generic_load(&self->mem_map, self->arch_state.current_pc, 4, inst_in_bytes);
    // transformation from byte array into single uint32_t
    inst_fields_t ret = {};
    ret.raw |= (reg_t)inst_in_bytes[0];
    ret.raw |= (reg_t)inst_in_bytes[1] << 8;
    ret.raw |= (reg_t)inst_in_bytes[2] << 16;
    ret.raw |= (reg_t)inst_in_bytes[3] << 24;
    return ret;
}
In the fetch stage, the core fetch the raw binary instruction via MemoryMap_generic_load() function which accesses to the one of the memory devices in memory map. (The core access to the main memory or ROM at here.) You can view the function MemoryMap_generic_load() as a normal function to access the memory at this point, and the concepts about memory map and its implementation will be mentioned at Section 3.3.5.
However, the unit of memory access for MemoryMap_generic_load() is a single byte, instead of a word (32-bits in RISC-V). Hence, we must perform the transformation from a uint8_t array[4] into a single uint32_t manually in the fetch stage.
Decode
As what we have mentioned in Section 3.3.2, we can utilize inst_fields_t to decode instructions, and produces inst_enum_t. For example, one can implement the decoding logic as following:
Typically, it is common to scan the opcode firstly for decoding a RISC-V instruction, because the position of opcodes are always fixed in the RISC-V ISA. Next, we can scan the function codes such as funct3 or funct7 to further decode the raw binary into specific types of instruction.
The decoding logic we metion above is only for the simple cases such as RV32I-only implementation. For more sophisticated scenarios, the way we decode instructions might be much more complex.
Execute
After fetching and decoding an instruction, finally, we can now execute the instruction and update architectural visible states, and then update the program counter.
What the ISS must do at execution stage is quite simple: perform specific calculation according to the current instruction and update architectural visible states. We take ADD and SUB instructions as examples at here.
// ISS execution stage
void Core_execute(Core *self, inst_fields_t inst_fields, inst_enum_t inst_enum) {
    switch (inst_enum) {
        case inst_add:{
            self->arch_state.gpr[inst_fields.R_TYPE.rd] = self->arch_state.gpr[inst_fields.R_TYPE.rs1] + self->arch_state.gpr[inst_fields.R_TYPE.rs2];
            self->new_pc = self.arch_state.current_pc + 4;
            break;
        }
        case inst_sub: {
            self->arch_state.gpr[inst_fields.R_TYPE.rd] = self->arch_state.gpr[inst_fields.R_TYPE.rs1] - self->arch_state.gpr[inst_fields.R_TYPE.rs2];
            self->new_pc = self.arch_state.current_pc + 4;
            break;
        }
        ...
        ...
    }
}

static void Core_update_pc(Core *self) {
    self->arch_state.current_pc = self->new_pc;
}
As what we stated in Section 3.3.2, we can now implement the execution logic by simply using switch-case statement with the power of inst_enum_t, which is simple and straightforward.
3.3.4 Object-Oriented in The ISS
In this section, we heavily use function pointers in C language. Please go to STFW (search the friendly web) and RTFM (read the friendly manual) if you are not familiar with it.
Furthermore, we use const keyword as well. Please STFW for more information on how to use it.
Tick Class
In our ISS, we model the simulator as like a clock-trigger machine. Because of the OOP design paradigm, we want to utilize the capability of inheritance to express our code structure. Consequently, we define a base class which is called Tick, and the definition of Tick is as following:
tick.h
// parent class for general ticked devices
struct TickVtbl;
typedef struct {
    struct TickVtbl const *vtbl;
} Tick;

// define virtual table
struct TickVtbl {
    void (*tick)(Tick *const self);
};

// define public APIs
extern void Tick_ctor(Tick *const self);
extern void Tick_tick(Tick *const self);

// helper macros for children classes
#define SIGNATURE_TICK_TICK(cls) cls##_Tick_tick
#define DECLARE_TICK_TICK(cls) void (SIGNATURE_TICK_TICK(cls))(Tick *const self)
Inside tick.h, we define struct TickVtbl and the Tick class itself. The intention to define TickVtbl is to mimic polymorphism in OOP paradigm. As you can see, TickVtbl contains a function pointer which has the signature: void (*tick)(Tick *const self). It behaves like a virtual function in a C++ class. When another class want to interit from Tick class, it must implement the function tick via assigning to the function pointer (actually, it must create the virtual table instead).
For more information about how the C++ compiler implements polymorphism and virtual functions, you can google with the keyword: virtual method table.
tick.c
#include "tick.h"

#include <stdio.h>
#include <assert.h>
#include <stdbool.h>

static void _tick(Tick *const self) {
    assert(false);
    fprintf(stderr, "%s\n", "Please implement the virtual function!");
}

void Tick_ctor(Tick *const self) {
    assert(self != NULL);
    static struct TickVtbl const vtbl = { .tick = &_tick };
    self->vtbl                        = &vtbl;
}

void Tick_tick(Tick *const self) {
    assert((self != NULL) && (self->vtbl != NULL));
    self->vtbl->tick(self);
}
In order to produce runtime error when the children class does not define the tick function by itself, we put and assert(false) inside a static function _tick and assign it to the class Tick initially. By doing so, the parent class which inherits from Tick cannot call to the virtual function tick via Tick_tick() without override its definition.
In C++, we often use the syntax an_object.member_func() to call the specific member function of an object. It is actually a syntax sugar and can be implemented in other ways. In order to mimic the syntax sugar in C++, we simply define a function with the signature void Tick_tick(Tick *const self), and it just calls to the function pointer with the statement self->vtbl->tick(self).
Abstract Memory Class
Like what we mentioned in Section 3.3.5, all the devices can be loaded/stored are a kind of generic memory device. To model such devices, we define the base class called AbstractMem as following.
abstract_mem.h
#include "arch.h"

struct AbstractMemVtbl; // forward declaration
typedef struct {
    struct AbstractMemVtbl const *vtbl; // vtable ptr
} AbstractMem;

// define virtual table attribute
struct AbstractMemVtbl {
    void (*load)(const AbstractMem *self, addr_t base_addr, unsigned length, byte_t *buffer);
    void (*store)(AbstractMem *self, addr_t base_addr, unsigned length, const byte_t *ref_data);
};

// define public APIs
extern void AbstractMem_ctor(AbstractMem *self);
extern void
AbstractMem_load(const AbstractMem *self, addr_t base_addr, unsigned length, byte_t *buffer);
extern void
AbstractMem_store(AbstractMem *self, addr_t base_addr, unsigned length, const byte_t *ref_data);

// define helper macros
#define SIGNATURE_ABSTRACT_MEM_LOAD(cls) cls##_AbstractMem_load
#define DECLARE_ABSTRACT_MEM_LOAD(cls)                                          \
    void (SIGNATURE_ABSTRACT_MEM_LOAD(cls))(const AbstractMem *self,            \
                                           addr_t base_addr, unsigned length,   \
                                           byte_t *buffer)
#define SIGNATURE_ABSTRACT_MEM_STORE(cls) cls##_AbstractMem_store
#define DECLARE_ABSTRACT_MEM_STORE(cls)                                         \
    void (SIGNATURE_ABSTRACT_MEM_STORE(cls))(AbstractMem * self,                \
                                            addr_t base_addr, unsigned length,  \
                                            const byte_t *ref_data)
Similar with Tick base class, we also define AbstractMemVtbl and AbstractMem at here. Inside AbstractMemVtbl, there are two function pointers: load() and store() which represent the load/store capabilities of a generic memory device.
abstract_mem.c
#include "abstract_mem.h"

#include <stdio.h>
#include <assert.h>
#include <stdbool.h>

static void _load(const AbstractMem *self, addr_t base_addr, unsigned length, byte_t *buffer) {
    assert(false);
    fprintf(stderr, "%s\n", "Please implement the virtual function!");
}

static void _store(AbstractMem *self, addr_t base_addr, unsigned length, const byte_t *ref_data) {
    assert(false);
    fprintf(stderr, "%s\n", "Please implement the virtual function!");
}

void AbstractMem_ctor(AbstractMem *self) {
    assert(self != NULL);
    static struct AbstractMemVtbl const vtbl = { .load = &_load, .store = &_store };
    self->vtbl = &vtbl;
}

void AbstractMem_load(const AbstractMem *self, addr_t base_addr, unsigned length, byte_t *buffer) {
    assert((self != NULL) && (self->vtbl != NULL));
    self->vtbl->load(self, base_addr, length, buffer);
}

void AbstractMem_store(AbstractMem *self, addr_t base_addr, unsigned length, const byte_t *ref_data) {
    assert((self != NULL) && (self->vtbl != NULL));
    self->vtbl->store(self, base_addr, length, ref_data);
}
Please note that load and store are also virtual functions for class AbstractMem. In other words, the children classes which interit from ABstractMem class must define it own load and store function before call to AbstractMem_load() and AbstractMem_store().
If you are confused with the const keyword in C language, please refer to [1].
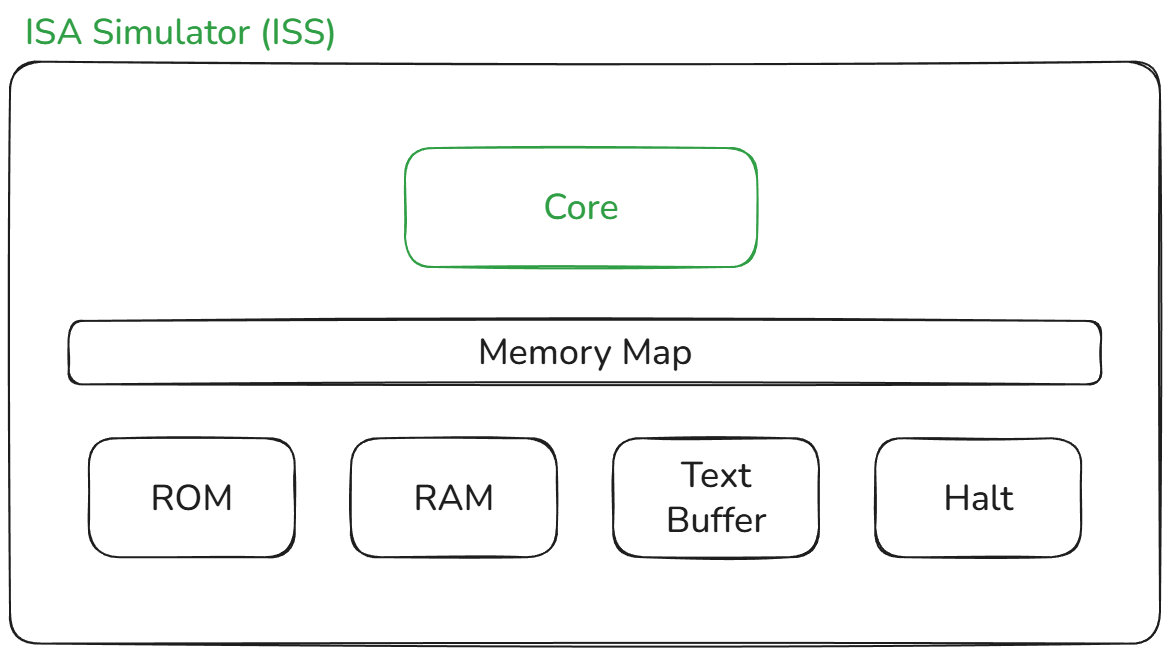
3.3.5 Generic Memory-Mapped Load/Store
The figure below shows the memory map of the ISS we implement. There are four generic memory devices inside the ISS: ROM, MainMem, TextBuffer, and Halt.

In order to make the ISS support Memory-Mapped I/O Control, we implement a class called MemoryMap and some other helper data structures and functions.
#include "abstract_mem.h"
#include "arch.h"

// helper data structures
typedef struct {
    addr_t first;
    addr_t second;
} addr_pair_t;
typedef struct {
    addr_pair_t addr_bound;
    AbstractMem *device_ptr;
} mmap_unit_t;

// define Memory Map
typedef struct {
    unsigned num_device;
    mmap_unit_t *memory_map_arr;
} MemoryMap;

/* Public APIs */
// member functions
extern int MemoryMap_ctor(MemoryMap *self);
extern void MemoryMap_dtor(MemoryMap *self);
extern int MemoryMap_add_device(MemoryMap *self, mmap_unit_t new_device);
// generic load/store APIs
extern void
MemoryMap_generic_load(MemoryMap *self, addr_t base_addr, unsigned length, byte_t *buffer);
extern void
MemoryMap_generic_store(MemoryMap *self, addr_t base_addr, unsigned length, const byte_t *ref_data);
In order to manipulate a generic memory device, the processor must know the following two pieces of information:
- Memory boundary of the device
- A pointer to the device (more specifically, a
AbstractMem *to the device)
As the result, we define addr_pair_t at the beginning, and then define mmap_unit_t which contains the two pieces we mention above. Finally, we can define the MemoryMap which has the number of generic memory devices and a dynamically allocated mmap_unit_t array.
Next, let’s examine how could we manage the MamoryMap via MemoryMap_add_device(MemoryMap* self, mmap_unit_t new_device):
int MemoryMap_add_device(MemoryMap *self, mmap_unit_t new_mem_map_unit) {
    assert(self != NULL);

    if (self->num_device == 0) {
        if (NULL == (self->memory_map_arr = malloc(sizeof(mmap_unit_t)))) {
            return -1;
        }
        self->num_device += 1;
        self->memory_map_arr[0] = new_mem_map_unit;
        return 0;
    }

    self->num_device += 1;
    mmap_unit_t *old_arr = self->memory_map_arr;
    if (NULL == (self->memory_map_arr = malloc(self->num_device * sizeof(mmap_unit_t)))) {
        return -1;
    }

    // copy old devices
    for (int i = 0; i < self->num_device - 1; i++) {
        self->memory_map_arr[i] = old_arr[i];
    }
    self->memory_map_arr[self->num_device - 1] = new_mem_map_unit;
    // release old array
    free(old_arr);
    return 0;
}
Finally, we can see how the load/store functionalities of MemoryMap is implemented:
We only examine the code segment about load operations because the implementation for store is quite similar.
void MemoryMap_generic_load(MemoryMap *self, addr_t base_addr, unsigned length, byte_t *buffer) {
    // check whether the pointer self is not NULL
    assert(self != NULL);

    // search for the device we want in the memory map (self->memory_map_arr)
    mmap_unit_t *mmap_unit_ptr = NULL;
    for (int i = 0; i < self->num_device; i++) {
        if ((base_addr >= self->memory_map_arr[i].addr_bound.first) &&
            (base_addr + length <= self->memory_map_arr[i].addr_bound.second)) {
            mmap_unit_ptr = &self->memory_map_arr[i];
        }
    }

    // checks whether the device is found
    Assert(mmap_unit_ptr != NULL, "MMIO search failed! The requested address is: 0x%08x, length is: %d",
           base_addr, length);

    // call generic load function of the device (which is related to AbstractMem parent class and inheritance)
    AbstractMem_load(mmap_unit_ptr->device_ptr,
                     base_addr - mmap_unit_ptr->addr_bound.first, length, buffer);
}
There are three steps in the MemoryMap_generic_load() function:
- Check whether the pointer
selfwhich points to theMemoryMapobject we want to manipulate isNULL. - Use linear search in the memory map to find the device we want to perform load operation. It might lead to a runtime error because of the
assert()statement if the device we want is not found. - Call to the actual implementation of load function the device which inherits from
AbstractMemviaAbstractMem_load()function.